I like the undercut.
You should first check with the creator how much wall thickness you have.
Check this also.
https://m.all3dp.com/2/pla-smoothing-a-beginner-s-guide/
PLA sands fairly easily. There aren’t many major precautions other than use some kind of dust collection or a respirator so you’re not inhaling the fine plastic particulates. Go through the various grits like any other plastic or wood item. Depending on how rough it is, I’d say start with something like 250 - 400 grit and work your way up to around 1500 - 2000 grit and then polish to get a super smooth glossy finish.
You can also use smoothing methods like kray posted as well. I have done quite a few 3d prints that have come out with a super fine gloss finish that looks like a production piece. It’s 100% doable, it just takes some work but totally worth it in the end.
Did you design/print that axle system? What’s the metal part and how is the plastic/metal axle assembled?
What are you using for the axle setup?
Yes.
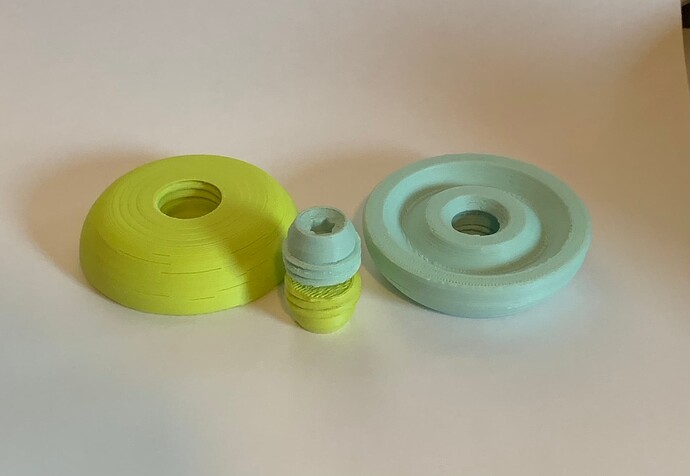
Designed to only go in from one side. Threads taper into each other so it gets tighter the more you turn. Smooth part tapers a tiny bit so that it self centers and helps “lock in” when fully screwed in. I’ll post a cross section of the axle cad file for you to see.
3/16” Steel Rod. Cut with angle grinder and assembled by eye. Need to make jig to help keep everything square. Gonna try an arbor press and press fit soon.
Glue/epoxy
See above ![]()
Really cool design. I don’t know how you thought of that. The yellow part looks really smooth which is why I asked. It doesn’t look printed.
.16mm layer height and matte overture filament… prints sooo nice.
Printed on a raft so that there is a slightly rough texture for response. Added a tiny bump around the axle hole in latest ones (blue) to see if it’ll help with 1A without taking away from OA.
Bonus: I figured out how to fingerspin to Helix on them yesterday!!!
How did you figure out how to do the threads so they’d align? Seems like real engineering.
Congrats on the trick. I’ve tried fingerspins on 1A yoyos like the Wedge, but haven’t succeeded as of yet.
Not hard in Fusion 360.
Hollow Bape Swap fixie. 35x57mm 57.5g
Changed the axle from flathead to a T40 and increased the chamfer on the end. Seems to be much more durable and really locks into place nicely.
Plays REALLY nice!
I like the use of the TORX key
It fingerspins way better than a flathead too!
Your design is getting better and better.
Thanks Glen!
I tried the press today for this axle. It went well on one half not so well on the other. Had trouble keeping everything square and had to glue one side. Cut the axle rod with an angle grinder and end wasn’t square or tapered enough, so that was contributing to the problem. I think I need to make a jig or something to hold everything and another to place between them to set the gap. Gonna try cutting next ones with a miter saw.
Any press tips?
To help it go in square, bevel the ends a little. You could just sand them back with a belt sander, that should work. You need to make sure that both ends of the axle have a flat edge too.
Why did you have to glue one side? Was it a sloppy fit? I supporse you’ll just need to keep working at dialling in the print to get the tolerance right.
Also, go really slow when pressing it in if you are unsure if it’s square. Press it in a couple of mm, then rotate the piece and continue a few times until it’s all the way in.
I experimented today with a new method to finish my plastic unresponsive halves. In the past I’ve sanded them on the lathe to a matte finish which is pretty aggressive, very hazardous to my health and can look a bit streaky and furry. I tumbled these halved with ceramic media and cutting compound instead and the finish is superb both inside and out.
