The cut looks pretty clean to me
Yeah, it could use a little of that silicone Stickman suggested, but it is relatively clean. I could even clean it up more with the dremel sanding attachment too. Very impressed with that method. It beat the tomato paste can by a mile. ![]()
Hello Greg
There is a center hole in the arbor for a guide bit for the purpose of alignment, but because I was using it on a drill press, I never felt the need to use it. If I were to throw it in a handheld cordless drill, then I believe you would have no choice but to use a guide bit since it would want to drift on you. It also wants to pull the foam if you don’t use silicone on the bit. That pulling is how I almost lost my finger. The stiffer foam however really eliminates the pulling, which is why that’s all I use now.
So the guide bit is optional?
Sorry Greg, didn’t see your follow up question.
The arbor I use lets the guide bit be optional.
Thats a pretty nice looking case good job.
He has room to grow too…he can stick a hole above the Super G, but below the top row. The white foam has nice appeal to it.
Thanks, I went ahead and added the extra spot.
Changed the theme to my green / purple and blue color throws.
the purple V’s in the center are 1/2 green on the other half. ![]()
Decided to go ahead and make a second case tonight. I definitely had a much easier time of it with this one. I used my cordless drill and a 2" hole saw in reverse. Took 1/100th of the time, I bet.
And I already need to make a third…
^ Wow, you made a 40 yo-yo case too! ;D That looks great! I’m going to make a few more, just haven’t gotten around to it yet. I agree, it is much faster with the drill and the hole saw, for sure. Nice work.
By the way, I should get your throw in the mail tomorrow morning. ![]()
Nice work! I’m excited to start making my own and I’m definitely going the drill + 2" hole saw route. Did you use the center guide bit when drilling the holes (with the drill in reverse, of course)?
Wow, old topic! I actually did not use a center guide. I tried that way, but it messed up the holes.
Right? Didn’t realize how old it was until I sent the comment, lol.
Awesome. Thank you. Will definitely pull out the guide bit. And I’ll probably post some pics once I’m done with my case. Gotta keep this thread alive!
I would have expected the price would be higher to be honest! I bet you’d have a market at $85 for these. Not a massive market but when people are buying nice throws for well over a hundred bucks I don’t see why they wouldn’t spend less than that for an attractive case to display them in.
Ivan
Finished mine, thanks to all the awesome info on this thread. Bought a Samsonite suitcase (circa 1950s) off of EBay. My winning bid was $30, which is super low considering it came with a key (pretty rare, and others I found with a key are much more expensive).
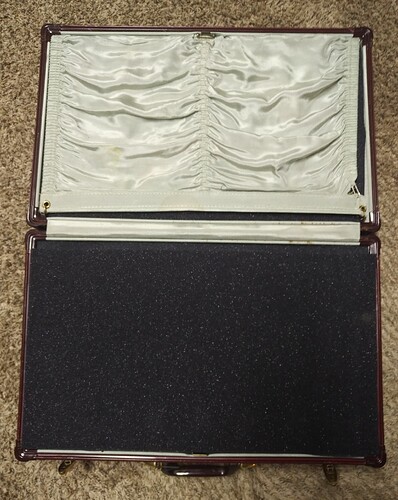
Suitcase came with a cloth and elastic divider (shown here on the top section) to hold in the clothes in that section from falling when you open the suitcase. I decided to leave it to help prevent the yo-yos from rubbing together.
I forgot to take a picture of the suitcase before I put the foam in. Here’s a very similar suitcase that has identical insides (mine is a bit lighter in color).
Bought some custom foam from foambymail.com and the 2" hole saw drill bit as advised above. The foam on the lower part of this image is 1/4" foam I ordered as extra protection to prevent the yo-yos from rubbing. I also put two pieces of 1/4" between the main foam and the bottom and top inside walls so the yo-yos wouldn’t rub. I cut out white circles (less than 2" in size) as place holders for where I was going to drill. Put the drill in reverse, lined the bit up over the dot, and drilled downward. I found it easier to have the drill on a fast speed, but to move downward slowly. Put a board below the foam, then held the foam in place with another board. Once I had the 28 holes in one half cut, I just held that over the uncut one and used it as a guide for cutting the uncut half. Worked great.
Probably overkill on a couple fronts, but I’m super happy with it.


