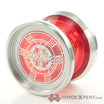
This includes your specified changes. Plus I put a small fillet on the sharp edge.
That looks amazing!!!
do you guys have covered printers? i have an A1 printing PLA but we have concerns about breathing in the fumes/microplastics
I have an enclosure that I added some fans and filters to, but I always just leave the door to it open lol.
I did some research when I first got into it and it seemed like for PLA you had to get higher than printing temp to release harmful chemicals into the air so I haven’t bothered. I do try to wear an n95 when sanding a print though.
I eat microplastics with noxious fumes for breakfast
For real though i print a couple hundred hours without a covering or ventilation and haven’t had issues. (that i know about)
Got the files from Keith and am snorting micro plastics as we speak. One half on each printer so assembly this afternoon if all goes well.
If you can get the Fusion file loaded making a change like recessing the cap should be easier (although I don’t know how much material there was there to work with).
Alrighty, it’s done! The new model is a beauty and it does print better. This is a fine looking Yoyo. However I will say that I did ■■■■ up on my bearing seat measurements that I gave Keith lol so the gap is wider than planned.
Bearing seat recess probably needs to be about 2x deep the measurement I quoted haha.
Managed to install Fusion 365 and move the recess in a mm. Will print fresh copies overnight and we will see how they look in the morning.
Let me know if you need any help. I might make a few tweaks and print tomorrow. Today I’ve been building up a stock of weights to send with printed throws.
No dice on the 1mm deeper bearing seat recess, that made the wall too thin for the stem, so the sides are now free spinning lol. Gotta tweak the model a bit.
I’m printing for Druid guts as we speak. Rather than chop off the back for a flat surface I brought down a line from furthest back point of the rim to make a high walled gap. That gave me plenty of material to recess guts into. Results shortly maybe?
Btw gifted the power of hindsight and knowing where I took it now, I might redraw the whole file from scratch again with some better parameters and constraints ![]()
For example, the change I mentioned above, taking a vertical line from the curve of the rim, is a vast simplification.
Interesting! Looking forward to results if it pays off.
Now that I have an aluminum one on hand I’m making some changes to the file as well, to hopefully bring it closer in dimensions to what I’m looking at in addition to fixing the thin wall. I lost my calipers so it’s all a bit of a guessing game haha.
You can print calipers! They are better than nothing. In hindsight I’d print them with recessed rather than raised printing.
Good to know! I might dust off my other other printer and get some calipers going while the new Rbc prototype prints.
Here it is. @MarkD, your move!
It’s a tad too heavy and the nice under curves didn’t print as cleanly as I would have hoped. I also need a tiny bit more material between the cap and seat, as the stem has a small bump to keep the seat distanced correctly.
Nice! Throws very well. One of my printers ■■■■ the bed while I was out so mine will be later today still haha.
Well now I want a 3d printed one in various materials. Won’t stop me from snagging a plasm too but might be a way to hold off the need for a plastic rbc
